Here's a collection of artworks that I finished just a few days ago.
About a year ago, I had an idea for a computer-aided 3D modeling project, but I just couldn't get a program to cooperate, and I gave up. But near the end of this past July, I decided to jump back into the project, and with a little Google Fu, I finally found a tutorial that explained how precision Dynamesh subtraction was supposed to work. Huzzah!
And with that knowledge at hand, I got it goin' on. Here's the result:


Now, obviously, I could go on at some length at how I accomplished all this... and I did!
Curious?
Here are the graphics applications I used while crafting this thing:


(I no longer have the document that shows this step in progress, so this screenshot will have to do.)
 Next, I built a cube and dug a chunk out of the top.
 The broken cube was placed so that it partially intersected with the bowl sphere. Just try doing that with modeling clay!
 I then had the Zbrush application delete the parts of the sphere that didn't share space with the cube.
(This is the point at which I got stuck during last year's attempt, but this time, it actually worked. Phew!)
Flush with success, and reveling in the joy of having jumped a major Zbrush hurdle, I decided that it was time for a jaunty new soundtrack!
 So with that out of the way, I selected the area that would end up as the dirt. I smoothed the edges a bit so that the edges of the pot would be visible in the final images.
Now it's time to get going on the tree! I could have created the trunk, roots and branches in Zbrush, but creating believable bark was beyond my current sculpting skills. What I needed was a bark texture that looked convincing and followed the contours of the curves of the tree, getting smaller as the branches tapered off.
 Luckily for me, there's a program that creates trees, and it automatically does all the things I needed. Speedtree is crazy useful. Check this YouTube video out.
I managed to fake my way to a close-enough tree model, and it only took a couple of days. There were some problem areas, but I figures that I could open the model in another program and fix the niggling trouble spots.
 And, yeah, I open the exported tree model in Silo -- and ZOMGWTFBBQ -- the model is seriously trashed. Wha hoppen? I try opening the original tree model file... and it's hopelessly corrupted. Can't salvage a thing.
FFFFFFFUUUUUUUUUUUU
Okay. Well. Nothing for it but to start again. Multiple backup copies, for serious.
And eventually, I get back to where I was four days prior to all of this. Yeah. Awesome. It's times like this that I fire up some dark tunes that fuel the aggressive determination to power through the repetition.
 Once the tree was brought back in line and polished up, I brought it into Zbrush, where I added the bark texture, as seen at left.
 ...And with the tree out of the way, I had no choice but to get started on the part that I'd been dreading -- the leaves.
Even before I'd started on the tree itself, I'd been making plans for how to accomplish the melted-wax shapes, and I knew it was going to be an ordeal. And it was time to get started.
First I made five disks and placed them where the leaves would be.
 It was at this point that my eye was caught on this perspective of the tree, dirt and disks. Still life with wires?
 Then I added some bumpy regions on the disks, and stretched the disks downwards, far enough to reach the floor. I knew that I wanted a few tendrils to reach the ground, but I didn't yet know where.
 Here's where it got agonizing. Time for some more dark music.
Broadly speaking, I had to draw on the areas where the waxy leaves would be -- a lot of detailing work, essentially.
Necessary, but not exactly glamorous work.
 Then I'd push the non-leaf areas of the shapes inward...
 ...and carve those areas out of the leaf models.
Not too bad, right?
 Ahh, but before I could carve out the cores from the leaf objects, I had to do some texture work. Here we see the leaf objects with some broad-stroke lumps,. Those big lumps would provide the basis for large, oozing drips.
 Then, they're hollowed out.
 Here's the right-side leaf object, after I added some smaller lumpy texturing. I wasn't too concerned with fine details at this stage. All I needed to worry about was making sure that there was a general impression of drippiness.
 Here's the same object, and it's right where I wanted it. I'd smoothed it a few times, and POW! Despite my worries, I'd managed to get the lumpy molten wax look that I'd been hoping to achieve.
Damn, it feels good to be a gangsta.
But when I got around to working on the splashes on the pot and the ground, I just couldn't get the splashes looking right.
What to do?
 Well, how about fluid simulation? Sure!
I imported the models into RealFlow, and placed fluid emitters at the points where the wax tendrils would be dripping onto the other surfaces. The water droplets are colored white when they're moving quickly, and they're colored more blue as they slow down and stop,
 Here's a render of the fluids before I got the fine details down.
The pot and backdrop are rendered with the chocolate material. Yum!
 Once the fluid simulation was complete, I brought it into ZBrush and combined it with the leaves.
I did a last bit of sculpting on the pooled wax on the ground. That tree was done, man.
Here's a false-color screengrab of the finished tree and leaves.
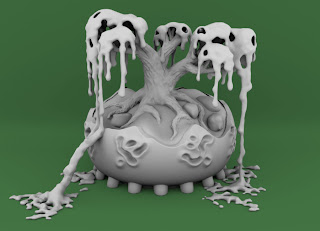 Here's a simple render of all objects, with a simple grey material.
What's left to discuss? Well, there's the lighting and surface material assembly, but take my work for it -- those topics are dull as hell, and make for some boring-ass screenshots.
So here it must end.
About a year ago, I had an idea for a computer-aided 3D modeling project, but I just couldn't get a program to cooperate, and I gave up. But near the end of this past July, I decided to jump back into the project, and with a little Google Fu, I finally found a tutorial that explained how precision Dynamesh subtraction was supposed to work. Huzzah!
And with that knowledge at hand, I got it goin' on. Here's the result:

Pretty fine. And because I do so love my variations, there's this jade overdose...

...and a sloppy-paint version.

Now, obviously, I could go on at some length at how I accomplished all this... and I did!
Curious?
Here are the graphics applications I used while crafting this thing:
- Silo 2 - basis modeling of the pot; fine-tuning the raw tree model
- Zbrush 4R6 - sculpting the fine details on the models; creating masks that would be used in modo to isolate shader regions
- SpeedTree 5 - building the base tree model, creating the bark texture map
- RealFlow 2013 - creating the spilled drops of jade
- Bryce 7 - creating the terrain that would form the rough edges of the broken cube; creating the stones that would be placed into the sand
- modo 701 - lighting, shading and rendering
- Photoshop CS6 - cleaning up stencil masks; final compositing

The first object I built was a squashed wireframe sphere, which would be the basis for the pot. I flattened the base, and added feet, which would provide a bit of visual interest.
Here we see the model from underneath.
Here we see the model from underneath.

Then I added the glyphs, which I modeled vaguely on kanji characters, but are made up and therefore mean nothing.
(I no longer have the document that shows this step in progress, so this screenshot will have to do.)
 Next, I built a cube and dug a chunk out of the top.
 The broken cube was placed so that it partially intersected with the bowl sphere. Just try doing that with modeling clay!
 I then had the Zbrush application delete the parts of the sphere that didn't share space with the cube.
(This is the point at which I got stuck during last year's attempt, but this time, it actually worked. Phew!)
Flush with success, and reveling in the joy of having jumped a major Zbrush hurdle, I decided that it was time for a jaunty new soundtrack!
 So with that out of the way, I selected the area that would end up as the dirt. I smoothed the edges a bit so that the edges of the pot would be visible in the final images.
Now it's time to get going on the tree! I could have created the trunk, roots and branches in Zbrush, but creating believable bark was beyond my current sculpting skills. What I needed was a bark texture that looked convincing and followed the contours of the curves of the tree, getting smaller as the branches tapered off.

I managed to fake my way to a close-enough tree model, and it only took a couple of days. There were some problem areas, but I figures that I could open the model in another program and fix the niggling trouble spots.

FFFFFFFUUUUUUUUUUUU
Okay. Well. Nothing for it but to start again. Multiple backup copies, for serious.
And eventually, I get back to where I was four days prior to all of this. Yeah. Awesome. It's times like this that I fire up some dark tunes that fuel the aggressive determination to power through the repetition.


Even before I'd started on the tree itself, I'd been making plans for how to accomplish the melted-wax shapes, and I knew it was going to be an ordeal. And it was time to get started.
First I made five disks and placed them where the leaves would be.


Broadly speaking, I had to draw on the areas where the waxy leaves would be -- a lot of detailing work, essentially.
Necessary, but not exactly glamorous work.


Not too bad, right?


Damn, it feels good to be a gangsta.
But when I got around to working on the splashes on the pot and the ground, I just couldn't get the splashes looking right.
What to do?

I imported the models into RealFlow, and placed fluid emitters at the points where the wax tendrils would be dripping onto the other surfaces. The water droplets are colored white when they're moving quickly, and they're colored more blue as they slow down and stop,

The pot and backdrop are rendered with the chocolate material. Yum!

I did a last bit of sculpting on the pooled wax on the ground. That tree was done, man.
Here's a false-color screengrab of the finished tree and leaves.

What's left to discuss? Well, there's the lighting and surface material assembly, but take my work for it -- those topics are dull as hell, and make for some boring-ass screenshots.
So here it must end.
No comments:
Post a Comment
I will mercilessly trash any comments I deem unworthy. So if you're going to be offensive, you damn sure better be funny.
I may feed the trolls if they make it worth my while to do so. Here's a hint: I don't like typos. Run with it!